I know I promised that I wouldn't go to the craft store, but I was out of fusible interfacing and what can you make without fusible interfacing and I also had this idea that needed ric rac and while I was there I saw a boootiful piece of linen for $2 so you can't fault me for any of that... and I have my period.
Yes, today I made a tampon cozy. And it has a face. A *grimace* face. How-to follows, but if you don't want to know how-to, scroll down to the fun part at the end.
Supplies
7" x 9" Outer fabric
7" x 9" Lining fabric
7" x 9" Fusible interfacing
8.5" Red ric rac
Black embroidery floss and needle
Coordinating thread
1 button
Clip 3/8" seam allowance off interfacing and fuse to outer fabric. Embroider eyes 2" from the sides and 1.75" from the top.
Pin outer fabric to lining fabric, wrong sides together, and sew together leaving 3/8" seam allowance.
Leave two openings at the corners of the mouth, so to speak. Make sure one of them is big enough to push the fabric through (although if you make it a little bit too tight, it could be an appropriate metaphor for the... never mind.)
Flip inside out and iron flat, neatening the openings
Pin ric rac to the top of the front, and fold edges into the openings. Sew in place.
Fold over the bottom so that the top flap is 2.5" long. Pin in place, and sew down the edges. I recommend using a topstitch or denim needle for this, as the fabric is quite thick here.

Pull out your buttonhole foot and make a buttonhole between the eyes, about 1" from the edge.
Sew button to the inside about 0.5" from the edge. Stuff with four tampons and go!
Now, here's the fun part:
Since I ran through this design twice to get the how-to right, I have an extra tampon cozy. So, giveaway! If you would like this tampon cozy, introduce yourself in the comments, and leave some way to contact you, and I'll pick a winner next week. Good times!!
Friday, September 26, 2008
*Grimace*

Tuesday, September 2, 2008
Mario Piranha Plant/Pipe TP Cozy

My craftster challenge entry is up. I wish I could enter this contest, like, a hundred times.
Wednesday, August 6, 2008
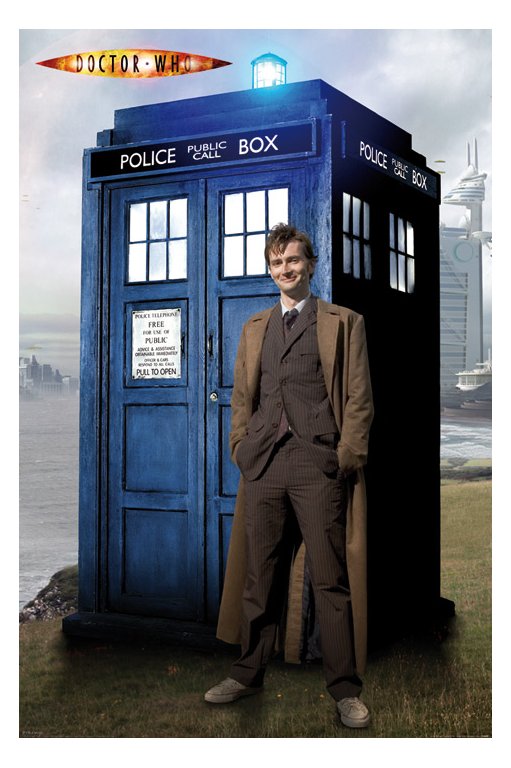
Tardis Tissue Box Cozy
UPDATE: This blog post has gone around some, which is awesome, but I know these instructions are a little fly-by-night. If you want any help please feel free to comment and I will respond.

The BBC has actually copyrighted the TARDIS design, which is one of those interesting copyright oddities since clearly this "design" was just borrowed from actual police boxes designed for the London PD. Whatever, I'm not selling this.
Supplies:
20x20" Fusible interfacing
1/4 yd Dark denim
1/4 yd lining
Silver Satin (scraps)
Embroidery floss (white and navy)
Print n Press transfer paper (dark fabric)
Sewing Machine, denim needle & navy thread
Bead for top light
1 5.5x5.5" cardboard square
I wanted to do a more detailed HOWTO, but my process got changed and convoluted somewhere along the way so this is the best I can muster. Here's the basic template for the sides:

This should be about the size of the larger side of your tissue box. All the blue is one piece, and the dark blue sections form the top pieces. A base piece the size of the light blue area is also needed.
And here's the sign I used (with Print n Press transfer paper). Print this out for use on one of the denim base (door) pieces.

First step: cut interfacing into shapes based on template, then iron onto the denim. Notice one of the sides has to be split in half, for the door.

Next, cut them apart, cut open the "windows" and baste the window seams under. Topstitch the window pieces on top of strips of satin, and the base pieces. Then sew the sections together, with the "doors" on either end. After this I topstitched four corner pieces over the seams.

Embroidered "Police Public Call Box" labels. The window grids are also (very simply) embroidered.

I cut out a square piece of denim big with sides the length of one of the panels. As tissue boxes are not square, this did not fit exactly, but the cloth was forgiving. I sewed this to the top of my panels.
I added a lining to hide the embroidery mess on the inside. This was done by sewing together a lining in the same shape as the denim exterior, then sewing it to the denim, right sides together, and flipping it inside out.

It would have been more awesome if I had found a lining fabric that had a big polka dot pattern like the inside of the actual TARDIS... but I already had this, and I like money. Both of these fabrics are leftover from a certain other cozy project.
Almost done - just some last minute tailoring. I hand sewed the embroidered signs on at this stage.

The top is just five pieces of fabric sewn together and then hand stitched to the top. It is tightly stuffed so it could be used as a pin cushion if you are so inclined to have a pin cushion on top of your tissue box. The "light" is a clear bead tied on with embroidery floss.

The base is made by sewing denim around a piece of reclaimed cardboard, and then hand sewn to the cozy. I made the base in the actual dimensions of the tissue box (rather than square) and then just pushed the fabric around until it fit properly.

Some final product detail shots.


There really is a tissue box in there.


I love the otherworldly glow in this shot:

I also made a Dr. Who card, which I colored with a highlighter and a green marker. David Tennant, incidentally, looks like an older Scottish version of my brother. Who in turn looks like an older, American version of Daniel Radcliffe.

Friday, August 1, 2008
Best. Craftster Challenge. Ever.

(above cozy by Craftster user defaultbunny).
Craftster just announced their next challenge, called Cozies with Irony. Yes! I love silly cozies! What should I do for this contest??
Friday, May 2, 2008
Flowers Swapped

I sent off my first Craftster swap a few days ago, for the Flowers swap, and it arrived today. One medium and two smalls. I had a lot of fun doing this and when I have more time I've got to do another!
Oh my gosh. Is that... is that a toilet paper cozy? Jessica, do you have a problem? Do we need to send you to TP Cozies Anonymous?
I made this out of Dr. Girlfriend and the Monarch scraps, and for some reason I'm really proud of that. The pink is from her dress, and the orange is from his wings. The ribbon I bought for the dragon pillows before I decided to embroider them, and the button is something I bought for my wedding dress but did not use. So no, I don't have a problem; I spent $0 on this (and I also got to practice my button holes).
I'm going to post a HOWTO about making the flower, since I really like how it came out.
Pretty pretty recycling. This vase used to be an awesome bottle of vinegar. It's my first experiment with glass paint, and I wish I had used a natural brush as recommended so it wouldn't be so thick and streaky. But I still like it. The flower in there is now quite dead, and I didn't make any flowers to put in it, but I recommend a few buds of Gerbera daiseys, like so.
Note cards from a painting I made of the flower above. I really love watercolor, it prints up so nicely. These were also a stash buster, made from the leftover paper from my wedding invitations.
I sorta considered sending her my leftover wedding invitations themselves, but that would be such a cheat, right? Yes. Now I have to decide what to do with the actual painting. I wonder if my mother would like it for Mother's Day - she could put it on the fridge, like old times.
Monday, April 7, 2008
Flesh Tank! TP Cozy

I've demonstrated a fondness for kitschy cozies, so add this one to the list.
I made this one for a friend who is a huge Narutard Naruto fan. I made it for Christmas but I only got around to photographing it now. It was kind of hurried, so I had to give it to him before I got to photograph it, and also before I was able to, um, buy thread in matching colors. Yeah.
This character's name is Choji. Choji is a kid that everyone underestimates because he is fat and sweet natured, but he is a tough cookie. His main attack is called Flesh Tank in the Hong Kong version I've been watching; he can turn his body into a giant bowling ball and steamroll his foes. I think it is translated as something else in the Cartoon Network version but you get the idea.
So it's his giant bowling ball form that conceals the toilet paper. His body is made out of various scraps from the remnant bin. His hair is made out of the same yarn as the White Mage above. His face, feet, hands, and Leaf village symbol are made out of polymer clay. Have I mentioned how awesome Fimo is?
Friday, March 14, 2008
Miz Bear TP Cozy

When I was growing up, my mother had one of those oft-insulted toilet paper cozies. It was crochet or macrame, and it had a face - a cat I think. It was a little silly. But you know what? There was always toilet paper near the toilet when you were doing your business, and that is important.
So I really wanted a toilet paper cozy. I spent some time on Etsy and I found these, by LK Craft Creations. But I couldn't find the color I wanted, and really, the crochet might be a little much.
So I went thrift shopping trying to find a doll, a beat up abandoned Barbie, maybe, and I couldn't find any. It was weird. But I did find that bear, it was a Hallmark bear that sang a terrible song. I gutted her innards, removing the awful music box. I picked some fabric from my scraps that matched my wallpaper, then I sewed the dress and the ruffle and the hat around her. 
Her name is Miz Bear, because she may be related to Mistah Bear. I think the hat makes her look very official, like a concierge. A concierge with toilet paper. 
"Oh, my goodness! How embarassing..."
Saturday, December 8, 2007
Final Fantasy Wine Cozies

I like giving wine as a present, because it tastes good, and it's special. But sometimes you need to make it a little more special, or at least... more silly. Enter wine cozies. (image from hometownchina.com)
These wine dresses are wonderful kitsch. They dress up a bottle of wine, which, you know, doesn't actually need clothing. They are attractive and hideous at the same time. Swoon.
So I thought, how much cooler would it be if it were g33kier? Like if instead of generic chinese dresses, these classy bottles of wine were wearing robes of white and black mages from Final Fantasy?(!)
I know, technically white and red would make more sense, as these are the colors of wine, but the black mage outfit is so much cuter than the red mage outfit. Here's what I did.
White Mage

Supplies you will need:
White Satin, for the robe outside
White knit, for the robe lining
White ribbon, thin, for the fastening
Red fabric paint or acrylic paint
(and a small, stiff paint brush)
Strawberry blonde yarn, the cheaper the better
1. The robe
Cut a piece of the satin and a piece of the lining in a flattened cape shape, like this. Make sure its scaled properly for a bottle of wine, this is just a rough sketch.

With a machine, sew them together around the outside with white thread, with the outside of the fabric facing each other, leaving a small hole at the bottom. Flip it inside out and then sew the hole shut. Hand sew the top of the head of the cape together. Test it out on a bottle of wine and see how it looks.
2. Triangle trim
I'm sure this would look great if you hand made each triangle sewed them on the robe... but come on, this is just a wine dress.
I recommend the little cheap bottles of acrylic craft paint at Michaels, or some Tulip fabric paint, and a small, square paint brush (cheap=OK). Mark out even intervals on the satin with a pencil, then just draw the triangles freehand. This is easy, we learned triangles in kindergarten. However, waiting for them to dry is hard.
Is it dry yet?
Is it dry yet?
3. Neck fastening
I wanted to tie her robe closed at the neck with some ribbon, and also give the neck a nice ruffle texture.
About.com decribes how to make a ruffle here. After forming the ruffle, sew the ribbon around the neck and tie a pretty bow. After making sure the robe still fits loosely over a wine bottle, sew the bow in place so its perfect bowness doesn't get mussed in the future.
4. Hair
Figure out how long you need the hair to be, then double that length and add an extra 1/3 for safety and knotting and braiding. Unravel a length of yarn from your skein that is 12x that length. Cut it in 6 equal pieces, line them up, and tie a tight single knot in the middle.
You should now have 6 pieces of equal length hanging off each side of the knot. Braid them. Tie off the ends. Sew the top knot into the top of the hood of the cape.
Black Mage

Suppies you will need
Blue silky fabric, for robe outside
Blue stiff fabric, like denim, for lining
Tan needlework fabric, the stuff with the holes in it, for hat
Plain tan cloth, for hat lining
A hook and eye type fastener, or some silver Effect Sculpy
Hot glue gun
1. Fastener
You can buy a nice fastener something like this at Joann Fabrics and skip this step, but if you are a Sculpy luver like me and already have some on hand, this is fun.
Roll out two chunks of silver Sculpy into two thin strands. Roll them together so they look like a nice spiral. Cut this in half. Shape the spiral strands into a hook and eye, with loops for the thread to go through. Make sure they fit together. Bake in oven according to directions.
2. The robe
Cut a piece of the silky fabric and a piece of the stiff fabric into these shapes.
(I must stress at this point that these shapes are approximate and not to scale - I didn't really keep track of this as I was going along. Make sure to measure your shapes against a real wine bottle, and let me know if something is grievously wrong.)

As with the white mage robe, sew together around the outside, leaving a small hole. Then outside of the fabric facing in, then flip outside out and finish the hole. Sew the two pieces together with a few well placed stitches, then sew the fastener on at the neck.
3. The hat
I spent a lot of time looking for the perfect fabric to approximate straw - because I didn't want to really weave a straw wizard's hat. I found needlepoint fabric, which has a big weave look and a nice rough texture.
I really hacked this out, there is a probably a better way but I was getting tired. If you want to look at a commercial witch hat and see how it is sewed together, that might work better. This is what I did. Cut the tan base fabric and the needlepoint fabric so they look something like this.
 With a sewing machine, sew the top part of the base fabric to the brim. Then sew the seam of the top part together. Its OK if this looks totally crappy as long as it's the right basic shape.
Now, hot glue the needlepoint pieces to the base shape.
There will be an ugly seam between the top part and the brim part. I covered this with a hat band made of the blue silky fabric from the robe.
Now you're all done! Share these with a fellow g33k, or horde for yourself.