I made a mini version of my bathroom to go in my bathroom.


Here are some photos of my real bathroom for comparison:


It’s newly updated please tell me it’s pretty. And also how cool my tiny version is. I am normal.
Here are some process notes:
Vanity:
I bought a dollhouse dresser & sink on Amazon, https://www.amazon.com/dp/B0BGQSGYQ7 https://a.co/d/0n1k4vy
…then customized the dresser with scrap balsa wood, and painted it rustic brown. I drilled a hole in the top for the sink using a 1.25” hole saw drill bit.
Tile:
The floor tiles are Premo polymer clay, marble clay tutorial here: https://blog.sculpey.com/how-to-marble-polymer-clay-tips-and-project-ideas . It’s cut into 1” squares, baked, and glued to a piece of balsa wood. I then made a ‘grout’ out of thick chalk paint (plaster of Paris + craft paint).
The counter tiles are white craft foam. Grout lines grooved with a soldering iron and the same chalk paint grout.
End table & box:
Hand made from pieces of a dollar tree wood bird house craft kit and popsicle sticks, held together with Tacky Glue. ‘Hinge’ on the box is card stock.

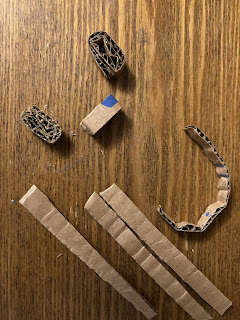
Basket:
Made of woven card stock using this tutorial: Joanne’s minis https://youtu.be/isyfGE7PG5I
This was probably the most intense thing to make, it is a little out of scale and I’m not fixing it. I like that the handle swivels, thanks to a head pin.

Joanne has a blog I really enjoyed, lots of good ideas: https://joannesminis.blogspot.com/
The towels inside are old cut up baby towels.
Toilet:
This is from Michaels. It’s not super accurate but it’s what inspired the whole project so I’m keeping it. Might make it a tank lid & handle some day.
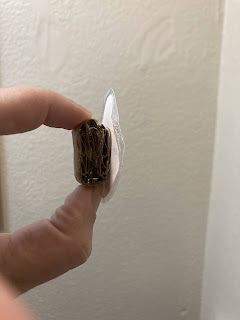
TP & holder:
Tiny bits of toilet paper wrapped around card stock (the same as the basket). This tutorial: https://youtu.be/Nwqexdp1vTI?si=f-f58MXAp5JL7dBQ

Toilet paper holder is a twisted nail, jewelry ball joint, half a rivet and a small square washer.

Trash can:
A cut section of glue stick, with balsa wood details and a washer on top. Hinge is jewelry wire and card stock.
Vases:
Left vase started with a vase from Miniature Crush on Etsy: https://www.etsy.com/listing/1230877214/ I painted it turquoise and added a Premo base. Filled with dry grass and feather tips.
Right vase stand is all Premo clay, marbled.
Cups:
All the translucent turquoise pieces were custom made by TheCraftysShop on Etsy. They are resin and amazing. I filled the candles with dimensional fabric paint ‘wax’ and gave them straw wicks.

New York style coffee cup is a white Tacky Glue cap, with the label printed on photo paper.
Toothbrushes and toothpaste:
Toothpaste: a plastic straw, filled it with hot glue and pinched one side closed, with a white perle bead for a cap.
Toothbrushes are painted toothpicks with little bits of craft foam glued to them.

Based on this tutorial: https://youtu.be/WDVw3ep5WBY
Soap dispenser:
Made of beads and a head pin. I might make this, if I can find better beads, I wish the top was shinier. Tutorial: https://youtu.be/GMfX_Ql6q9E?si=vQhG7RuSPzE8y0rW
Mirror:
I bought dollhouse moulding from Miniature Crush and cut it to size with miter sheers. This is pretty much how we made the real mirror frame! The mirror itself is an adhesive mirror from Joann Fabrics, cut to size.
Art:
Print on the wall is Dirty Dogs of Paris by Boris O’Klein. I printed it 1/12 size, added a cardboard back, popsicle stick frame (also miter sheers) and ‘glass’ made from plastic food packaging.
The original unicorns are chalkware horses that I modified. These are finely sculpted Premo clay.

I think that’s everything!